Last updated: 8 October 2026. Every screenshot below was recorded on 8 October 2026 on an IQ Option Practice account registered in Brazil, on EUR/USD 5-minute candles; the Chart analysis picture in Step 1 was recorded on 5 October 2026. We placed no real-money trade. The settings come from the platform’s dialog. The tested box shows what four signals, a bounce from a band and a break through it, each with and without the EMA 200 filter, did on EUR/USD candles recorded between 29 September and 5 October 2026; it says nothing about what will happen next.
Bollinger Bands draw two lines around a moving average: a middle line, the simple moving average of the close, and an upper and a lower band that lie a number of standard deviations away from it. The usual setting is a period of 20 and a deviation of 2; the platform opens the indicator with a period of 14 and a deviation of 2. It gives four signals: a bounce (sell when the price reaches the upper band, buy when it reaches the lower band), the same with a trend filter, a break (buy on a close above the upper band, sell on a close below the lower band), and the break with the filter. On 5-minute EUR/USD candles from 29 September to 5 October 2026 the plain bounce gave 114 signals and won 55 of 111 decided trades (49.5%), the break gave 82 signals and won 51.2%, and only the bounce with the EMA 200 filter (30 signals, 63.3%) and the bounce at a deviation of 3 (29 signals, 57.7%) came out above the break-even rate of 54.1% at an 85% payout, on very few trades.
Video tutorial
Quick answer
- What it plots: three lines on the price chart: a middle line (the simple moving average of the close) and an upper and a lower band.
- Formula: middle = average of the last n closes; bands = middle ± deviation × the standard deviation of those n closes.
- Settings on the platform: Period 14 and Deviation 2 by default; the usual setting is a period of 20.
- Bounce: the price reaches the upper band, sell; it reaches the lower band, buy. Break: a close above the upper band, buy; below the lower band, sell.
- Filter: take only the signals in the direction of the EMA 200, or widen the bands to a deviation of 3 for fewer signals.
- Tested: bounce 114 signals, 49.5% of the decided trades won; break 82 signals, 51.2%; the filtered bounce 30 signals, 63.3%. Break-even is 54.1% at an 85% payout, and a few days of one pair prove nothing.
How do you add Bollinger Bands on IQ Option?
Set the chart
Choose the asset, the chart type and the candle size first: the indicator is calculated from the candles on the chart. The examples in this guide use 5-minute candles on EUR/USD. These steps use the web traderoom on a Practice balance, and the numbers in each screenshot match the numbers in the text. If you do not have an account yet, see how to register.
Step 1: Open Chart analysis
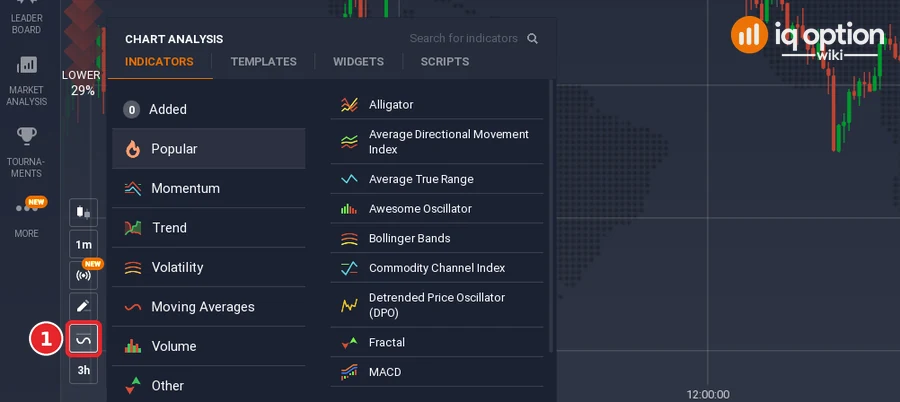
Click the indicators button (1), the wave icon in the chart toolbar at the bottom left of the chart. The Chart analysis panel opens with the tabs Indicators, Templates, Widgets and Scripts. Stay on Indicators.
Step 2: Find Bollinger Bands
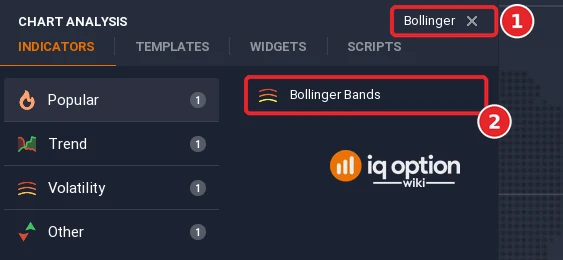
Type “Bollinger” in the Search for indicators box (1) and click Bollinger Bands (2).
Step 3: Set the period to 20
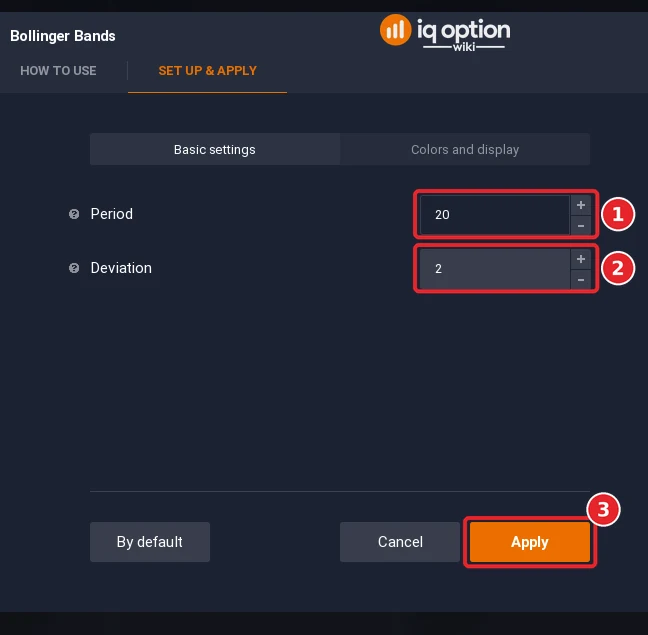
The dialog opens on the Set up & apply tab, on Basic settings, with Period 14 and Deviation 2. A period of 20 is usual: replace the 14 in Period (1), leave Deviation (2) at 2 and click Apply (3).
Step 4: Use 5-minute candles
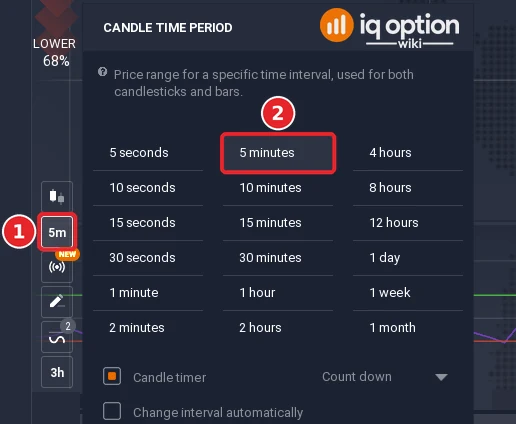
Click the candle time period button (1) in the toolbar at the left of the chart; it shows the current period, 5m in the picture. In the menu that opens, choose 5 minutes (2). No candle size is prescribed; the examples and the replay on this page use 5-minute candles.
Step 5: Read the three lines
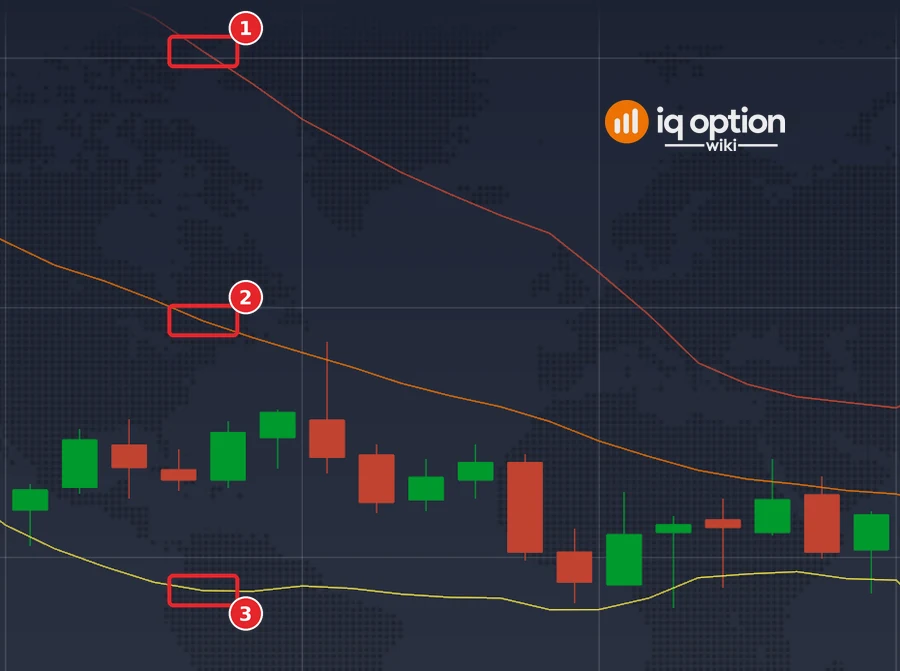
The price chart shows the upper band (1), a red line, the middle line (2), orange, and the lower band (3), yellow. These are the platform’s colours for the Upper, Middle and Lower line. The bands widen when the closes of the last candles spread out and narrow when they bunch together.
How are Bollinger Bands calculated?
The middle line is the simple moving average of the closing price over the period: with a period of 20 on 5-minute candles it is the average of the last 20 closes, 100 minutes of trading. The upper band is the middle line plus the deviation times the standard deviation of those same closes, and the lower band is the middle line minus it. In short: the SMA 20 plus or minus twice the 20-candle standard deviation. The standard deviation is the population form, divided by n and not by n minus 1: the bands the platform drew on a recorded chart matched that form to within about half a pixel, and the n minus 1 form to about four pixels. The wider the price swings in the last candles, the wider the gap between the bands.
The deviation decides how often the price reaches the bands. On the 1,296 five-minute candles of our recording for which a band with a period of 20 exists, the close was outside the bands on 171 candles (13.2%) with a deviation of 2 and on 9 candles (0.7%) with a deviation of 3. The median distance between the bands was 14.6 pips with a deviation of 2 and 21.9 pips with a deviation of 3.
How do the four signals work?
There are two opposite ways to use the bands, and the second one is meant for highly volatile markets, with cryptocurrencies as the usual example. Both are written here so that every condition is checked on closed candles:
| Signal | Usual rule | Our rule for the replay |
|---|---|---|
| Bounce, sell | The price reaches the upper band | The first candle whose high reaches the upper band: Lower |
| Bounce, buy | The price reaches the lower band | The first candle whose low reaches the lower band: Higher |
| Break, buy | A candle closes above the upper band | The first candle that closes above the upper band: Higher |
| Break, sell | A candle closes below the lower band | The first candle that closes below the lower band: Lower |
| Trend filter | Take the signals that follow the EMA 200 | Higher only when the close is above the EMA 200, Lower only when it is below |
| Wider bands | Change the deviation from 2 to 3 for fewer, better signals | The bounce at a deviation of 3 |
Many bounce signals lose when the price runs along a band, so it is usual to wait for a reversal candle pattern at the band, to filter by the EMA 200, or to widen the bands. With the EMA 200 as a filter, all four signals can be used at once according to the market. The entry is at the close of the signal candle in our replay. No expiry is given, so we scored a trade of one candle (5 minutes) and one of three candles (15 minutes).
Where do the two signals disagree on the chart?
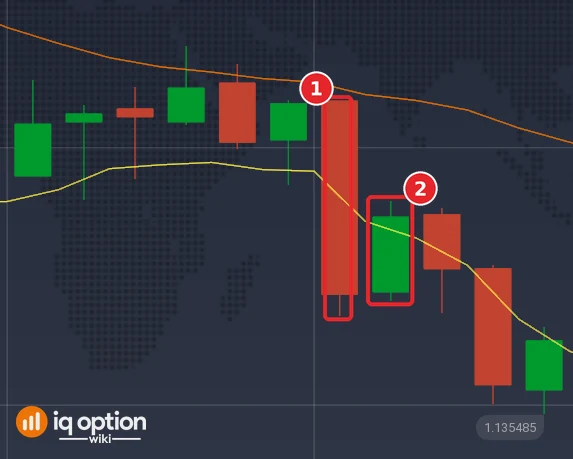
The first Lower bounce of the recording, on 29 September at 03:05 (platform clock, UTC minus three hours), is also a Higher break. The candle (1) opened at 03:05, its high reached the upper band and it closed at 03:10 at 1.13646 above the band: the bounce rule says Lower and the break rule says Higher, and both read the same candle. A trade of 5 minutes opened at that close ends at 03:15, when the next candle (2) closes at 1.13655, 0.9 pip higher: the Lower bounce lost and the Higher break won. A trade of 15 minutes ends at 03:25 at 1.13630, and the result turns round: the bounce won and the break lost.
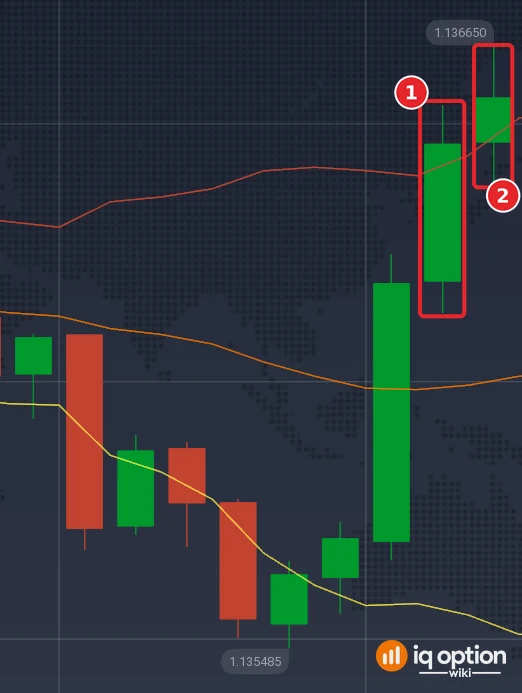
The first Lower break of the recording shows the same noise from the other side. On 29 September a candle (1) opened at 02:30 and closed at 02:35 at 1.135715, under the lower band, so the break rule says Lower. The next candle (2) closed at 1.135865, 1.5 pip higher, so the 5-minute trade lost; the 15-minute trade, which ends at 02:50 at 1.13554, won. One candle and one rule gave opposite results at the two expiries.
The four signals, tested
We scored every reading on the 1,334 five-minute candles of our recording (1,093 from 29 September to 2 October and 241 from 4 to 5 October). The EMA 200 readings count only the signals from the 401st candle on, because the platform’s EMA 200 has been running over earlier history and ours has to settle first.
Tested on IQ Option: Bollinger Bands bounce and break, EUR/USD 5-minute candles of 29 September to 5 October 2026
| Asset and candles | EUR/USD binary (regular, not OTC): 1,334 five-minute candles (2026-09-29 01:55 to 2026-10-02 20:55 UTC and 2026-10-04 21:00 to 2026-10-05 17:00 UTC). The candles were recorded from IQ Option’s Practice traderoom. The replay places no orders; it only scores the rule on those closed candles, at an 85% payout. |
|---|---|
| Rule tested | The four signals on closed candles, entering at the close of the signal candle: bounce, the first candle whose high reaches the upper band (Lower) or whose low reaches the lower band (Higher); break, the first close above the upper band (Higher) or below the lower band (Lower); each also with the EMA 200 filter (Higher only above the EMA 200, Lower only below it, counted from the 401st candle on), and the bounce at a deviation of 3. Bands: period 20, the platform’s own form of the deviation (divided by n). Trades of 5 and of 15 minutes. |
| Signals | Bounce, BB(20,2), 5-minute candles, 5-minute trade: 114 signals (70 Higher, 44 Lower) Bounce, BB(20,2), 5-minute candles, 15-minute trade: 113 signals (69 Higher, 44 Lower) Bounce with the EMA 200 filter, 5-minute trade: 30 signals (5 Higher, 25 Lower) Bounce with the EMA 200 filter, 15-minute trade: 30 signals (5 Higher, 25 Lower) Bounce at deviation 3, 5-minute trade: 29 signals (20 Higher, 9 Lower) Break, BB(20,2), 5-minute candles, 5-minute trade: 82 signals (31 Higher, 51 Lower) Break, BB(20,2), 5-minute candles, 15-minute trade: 82 signals (31 Higher, 51 Lower) Break with the EMA 200 filter, 5-minute trade: 44 signals (9 Higher, 35 Lower) Break with the EMA 200 filter, 15-minute trade: 44 signals (9 Higher, 35 Lower) |
| Outcomes | Bounce, BB(20,2), 5-minute candles, 5-minute trade: 55 won, 56 lost, 3 tied; 49.5% of the 111 decided trades won; net −$0.08 per $1 staked at 85% (−$0.05 at 91%) Bounce, BB(20,2), 5-minute candles, 15-minute trade: 55 won, 58 lost, 0 tied; 48.7% of the 113 decided trades won; net −$0.10 per $1 staked at 85% (−$0.07 at 91%) Bounce with the EMA 200 filter, 5-minute trade: 19 won, 11 lost, 0 tied; 63.3% of the 30 decided trades won; net +$0.17 per $1 staked at 85% (+$0.21 at 91%) Bounce with the EMA 200 filter, 15-minute trade: 20 won, 10 lost, 0 tied; 66.7% of the 30 decided trades won; net +$0.23 per $1 staked at 85% (+$0.27 at 91%) Bounce at deviation 3, 5-minute trade: 15 won, 11 lost, 3 tied; 57.7% of the 26 decided trades won; net +$0.06 per $1 staked at 85% (+$0.09 at 91%) Break, BB(20,2), 5-minute candles, 5-minute trade: 41 won, 39 lost, 2 tied; 51.2% of the 80 decided trades won; net −$0.05 per $1 staked at 85% (−$0.02 at 91%) Break, BB(20,2), 5-minute candles, 15-minute trade: 39 won, 43 lost, 0 tied; 47.6% of the 82 decided trades won; net −$0.12 per $1 staked at 85% (−$0.09 at 91%) Break with the EMA 200 filter, 5-minute trade: 21 won, 21 lost, 2 tied; 50.0% of the 42 decided trades won; net −$0.07 per $1 staked at 85% (−$0.04 at 91%) Break with the EMA 200 filter, 15-minute trade: 21 won, 23 lost, 0 tied; 47.7% of the 44 decided trades won; net −$0.12 per $1 staked at 85% (−$0.09 at 91%) |
| Break-even | At an 85% payout a trade needs to win more than 54.1% of its decided trades to break even (1 ÷ 1.85); at 91%, more than 52.4% (1 ÷ 1.91). |
A replay is only a look back at candles recorded on the dates above: it placed no real orders, covers about four and a half days of one pair, and counts overlapping trades as if they were independent. A short test proves nothing about the future, and no profit and no win rate is promised here. IQ Option’s own blog on backtesting says that most strategies need dozens, and often hundreds, of trades before a result means anything.
- Bounce: 114 signals, 55 won, 56 lost, 3 tied: 49.5%, with a 95% interval of 40% to 59%. With a trade of 15 minutes, 48.7%.
- Bounce with the EMA 200 filter: 30 signals, 19 won, 11 lost: 63.3% (interval 46% to 78%); 15 minutes, 66.7% (20 of 30). In the same stretch the plain bounce gave 85 signals and won 42 of 82 decided trades (51.2%). The filter removed most of the Higher signals: 52 of the 85 plain signals were Higher, only 5 of the 30 filtered ones.
- Bounce at a deviation of 3: 29 signals, 15 won, 11 lost, 3 tied: 57.7% (interval 39% to 74%).
- Break: 82 signals, 41 won, 39 lost, 2 tied: 51.2% (interval 40% to 62%); 15 minutes, 47.6%. With the EMA 200 filter 44 signals, 21 won, 21 lost, 2 tied: 50.0%; 15 minutes, 47.7%.
The unfiltered signals lose a little, which fits the usual warning that many bounce signals lose. The two readings that beat the break-even rate have 30 and 29 signals, with intervals that reach 46% and 39% at the bottom, so they show a direction worth testing on a Practice balance, not a result. The break stayed under the break-even rate at both expiries, with and without the filter.
Pros and Cons of Bollinger Bands
| Pros | Cons |
|---|---|
| One indicator with a clear picture of recent volatility: the bands widen and narrow with the candles. | The bounce and the break are opposite signals, and the same candle can give both. |
| Several ways to adjust it: period, deviation, a trend filter. | In our recording the plain bounce won 49.5% and the plain break 51.2%, both under the 54.1% needed at an 85% payout. |
| Works on any asset and candle size. | The two readings that did better had 30 and 29 signals only. |
Common mistakes
- Selling every touch of the upper band. In a strong move the price keeps running along the band; many bounce signals lose.
- Mixing the bounce and the break on one chart without a rule. A candle that closes outside the upper band is a sell for one rule and a buy for the other.
- Keeping the platform’s period of 14 while following a guide that uses 20. The bands, and so the signals, change.
- Using the EMA 200 filter on a short history. The EMA 200 needs several hundred candles before it settles.
- Taking 63% on 30 trades as proof. The interval runs from 46% to 78%.
Related guides
- The BB1 strategy and Candle colours with Bollinger Bands
- Bollinger Bands with the RSI and Pin bars with Bollinger Bands
- Trading with the EMA
- All indicator guides and all strategy guides
Frequently Asked Questions
Q: What are Bollinger Bands?
A: An indicator that draws a middle line, the simple moving average of the close, and an upper and a lower band that lie a number of standard deviations away from it.
Q: What settings does Bollinger Bands have on IQ Option?
A: The dialog opens with Period 14 and Deviation 2. The usual setting is a period of 20.
Q: What is the bounce signal?
A: The price reaches the upper band, which is a sell signal, or the lower band, which is a buy signal. In our replay it won 49.5% of 111 decided trades on 5-minute candles.
Q: What is the break signal?
A: A candle closes above the upper band, which is a buy signal, or below the lower band, which is a sell signal. In our replay it won 51.2% of 80 decided trades.
Q: What does a deviation of 3 do?
A: It widens the bands, so the price reaches them far less often: the close was outside on 0.7% of the candles instead of 13.2%. It is said to give fewer and better signals; our replay found 29 signals, 15 of them won.
Q: How long should the trade last?
A: No expiry is given. We scored 5 minutes and 15 minutes; the results were close for most readings.